martes, 29 de octubre de 2013

Limpiar Cache de SharePoint


En la cache de SharePoint se  almacena una relación de información de configuración que permite evitar tener que estar consultando constantementeinformacion al servidor SQL. Esto existe en cada servidor de la granja de Sharepoint.
En ocasiones cuando hacemos cambios en la configuracion de Sharepoint podemos encontrarnos con que esta información se puede corromper, tambien es recomendable realizarlo cuando se realizan modificaciones a las búsquedas.
Para realizar la limpieza debemos seguir los siguientes pasos:
  • Parar el servicio OWSTIMER.
  • Ir a  %ALLUSERSPROFILE% \Application Data\Microsoft\SharePoint\Config\GUID
  • Eliminar todos los ficheros XML de este directorio. No eliminar el fichero .INI
  • Abrir el fichero cache.ini con el bloc de notas, y cambiar el número a 1.Guardar y cerrar el fichero.
  • Arrancar el servicio OWSTIMER.

Esta  tarea debe realizarse en todos los servidores de Sharepoint donde se ejecute el servicio.

miércoles, 23 de octubre de 2013

Resolving SharePoint User profile SYNC

 
The Issues:
Certain User profiles are out of sync , normally users notice that before admin ( as usual) .Reason being , the profile sync services don’t generate any errors or exceptions , or simply you don’t have logging enabled on your farm for any reason.
The most noticeable symptom is a profile image missing , or a change in the Profile Source (like last name or phone number ) that does not show up at the site level.
Another symptom: the profile information show up fine on the profile service (My Site , Shared Services etc.) but not on certain sites.
Note:
Please read the following carefully and clear you mind from all the Google , MSN , MSDN ,TechNet noise ,there are so many problems and many solutions ,yet if you understand how things are wired together , you will be able to fully clear the problem yourself, no code nor technical support needed.
Architecture


Profile Synchronization Timer Job

Quick Profile Synchronization Timer Job

Profile Sync Life cycle:
[1] The Profile Source is in general an AD entry, a SQL record etc.
[2] The Profile by default has some properties as in, First Name, Last Name, Name (that is more of the display Name) and AccountName . Also the Profile services allow you to extend the profile properties as needed, different companies have different custom properties as they need [as in Department, Manager, Skill, etc.]
[3] The unique ID on the profile database is the [AccountName] or account and all sync operations are based on this particular attribute.
[4] There are two SYNC operations that are responsible for getting the Profile information from the Profile Source to the site level (Site Collection to be more correct).
  1. Profile Synchronization job : collect the profile from
  2. Quick Profile Synchronization job : Push profile into User Information Lists for each site collection.
Each Site Collection has a unique hidden list (hidden for a reason so do not change it and let us keep it this way.) the list is named “User Information List” on the API you can access it by
RootWeb.SiteUserInfoList (
just to explore and compare) .The List holds the information that we see on items like First Name and display name etc at the site collection level.
[5] Note that You can have a single SharePoint application with a single Content database or multiple Content databases, but at least one site collection per content databases, if the content database does not have any Site collection, you don’t need it. The Sync process iterate through each
We will go through the detection of the problem , reasons and the solutions.
First let us check the SQL configuration consistency.
Detecting using Stsadm:
C:\Program Files\Common Files\Microsoft Shared\Web Server Extensions\12\BIN>
stsadm -o sync -listolddatabases 0
That will show the synched databases within 0 days. (Not the un-synched as it might imply) so be careful.

So what you see here is the list of successfully synced content databases.
So If you have a list of all the content databases these should match number and Id.
Again to get all the content databases bases from the Central Admin -> application management -> Content databases.
The SQL part of things:
Notes: Microsoft does not like using direct SQL queries against any of the SharePoint Databases for the following reason
Queries against Content Databases will create Locks and that will slow the site(s) down, also may cause other services like search and profile sync to lockup.
Microsoft will not support your SharePoint system if you use CUD (Create , Update , Delete) operations against that farm
But after working with this technology for so long , you get familiar with the sql configurations etc.
It is not bad nor harmful to query the configuration databases.
The Sync status can be found in the following tables
DB :SharePoint_Config , Table :SiteMap
DB: SiteSynch
USE SharedServicesIntranet_DB
SELECT Sync.LastSynch , Sync.ChangeToken , Sync.SchemaVersion ,Sync.LastChangeSynchSuccess , Sync.Moving , Sync.moving Deleted , Sync .Registered , AppID.Name AS db , CdbID . Name AS webapp , SiteMap.Path
FROM dbo.SiteSynch Sync
JOIN SharePoint_Config.dbo.SiteMap SiteMap ON Sync.SiteID = SiteMap.ID
JOIN SharePoint_Config.dbo.Objects AppID ON SiteMap.ApplicationId =AppID.Id
JOIN SharePoint_Config.dbo.Objects CdbID ON SiteMap.DatabaseId =CdbID.Id
The result of that Query should be something like this , should not have any Deleted or moved.
 
Causes:
[1] One of the content databases could be offline or detached at the SQL server level. (check the list of content DBs under Central admin – > application management -> content databases
[2] Duplicate Content database Ids (happens when you move content DBs around). (Query the contentdbs table on the config database.)
[3] The database was prepared to be moved but never moved, and hence became out of sync.
[4] The not enough trimming between the Profile Sync Job and the Quick Profile Sync Job.
Solutions matches the causes above :
[1] check the list of content DBs under Central admin – > application management -> content databases. Also check your SQL Server for all the list of content databases.
stsadm -o deleteolddatabases 0
[2] If you duplicate content database Ids , you will have to detach/delete and reattach [Operation feared by most , but the safest of all]
stsadm -o preparetomove –url http://Server/SiteCollectionUrl/ -undo
Read more here
[3]You will have Un PrepareTomove …. Here is the command.
stsadm -o preparetomove –url http://Server/SiteCollectionUrl/ -undo
[4] The default timing is One hour for the Profile Sync Job and a one to few minutes for the Quick Profile Sync.
Those are controlled by the the following in order.
stsadm -o sync -SyncTiming <schedule(M/H/D:value)>
Sample :
stsadm -o sync –SyncTiming M:5 -SweepTiming M:1
I normally do that setting during debug
The Final solution :
This will fix any problem and all problems ( that I came across for all reasons )
The following sequence [for the databases that you want to sync]
stsadm -o preparetomove –url http://Server/SiteCollectionUrl/ -undo
stsadm -o deleteolddatabases 0
stsadm -o sync –SyncTiming M:5 -SweepTiming M:1 -IgnoreIsActive 1
wait for the next update ( and that should be under the Timer Job Status in Central Admin )
you should start see the fixed properties.
When done , fix your timing back to normal
stsadm -o sync –SyncTiming H:1 -SweepTiming M:5 -IgnoreIsActive 0

viernes, 18 de octubre de 2013

Windows SharePoint Services 3.0: "se ha producido un conflicto de actualización y debe volver a intentar esta acción"


Este problema se produce si el contenido de la caché del sistema de archivos en los servidores es más reciente que los contenidos de la base de datos de configuración. Después de realizar una recuperación del sistema, tendrá que borrar manualmente la caché del sistema de archivos en el servidor local.


Para resolver este problema, desactive la memoria caché en todos los servidores de la granja de servidores donde se ejecuta el servicio de temporizador de Windows SharePoint Services. Para ello, siga estos pasos:
  1. Detenga el servicio de temporizador. Para ello, siga estos pasos:
    1. Haga clic en Inicio, seleccione Herramientas administrativasy, a continuación, haga clic en Servicios.
    2. Pulse el botón derecho el Temporizador de Windows SharePoint Servicesy, a continuación, haga clic en Detener.
    3. Cierre la consola de servicios.
  2. En el equipo que ejecuta Microsoft Office SharePoint Server 2007 y en el que se aloja el sitio de Administración Central, haga clic en Inicio, haga clic en Ejecutar, escriba explorery, a continuación, presione ENTRAR.
  3. En el Explorador de Windows, busque y haga doble clic en la carpeta siguiente:
    Unidad: \Documents and Settings\All Users\Application Data\Microsoft\SharePoint\Config\GUID
    Notas
    • El marcador de posición de la Unidad especifica la letra de la unidad donde está instalado Windows. De manera predeterminada, Windows está instalado en la unidad C.
    • El marcador de posición GUID especifica la carpeta GUID.
    • La carpeta datos de programa puede estar oculto. Para ver la carpeta oculta, siga estos pasos:
      1. En el menú Herramientas , haga clic en Opciones de carpeta.
      2. Haga clic en la ficha Ver .
      3. En la lista Configuración avanzada , haga clic en Mostrar archivos y carpetas ocultos en archivos y carpetas ocultosy, a continuación, haga clic en Aceptar.
    • En Windows Server 2008, la caché de configuración está en la ubicación siguiente:
      Unidad: \ProgramData\Microsoft\SharePoint\Config\GUID
  4. Copia el archivo Cache.ini.
  5. Elimine todos los archivos de configuración XML en la carpeta GUID. Hacerlo así puede verificar que la carpeta GUID se reemplaza con nuevos archivos de configuración XML cuando se vuelve a generar la memoria caché.

    Nota Al vaciar la caché de configuración en la carpeta GUID, asegúrese de que no elimina la carpeta GUID y el archivo Cache.ini que se encuentra en la carpeta GUID.
  6. Haga doble clic en el archivo Cache.ini.
  7. En el menú Edición , haga clic en Seleccionar todo.
  8. En el menú Edición , haga clic en Eliminar.
  9. Escriba 1y, a continuación, haga clic en Guardar en el menú archivo .
  10. En el menú archivo , haga clic en Salir.
  11. Inicie el servicio de temporizador. Para ello, siga estos pasos:
    1. Haga clic en Inicio, seleccione Herramientas administrativasy, a continuación, haga clic en Servicios.
    2. Pulse el botón derecho el Temporizador de Windows SharePoint Servicesy, a continuación, haga clic en Inicio.
    3. Cierre la consola de servicios.
    Nota La memoria caché se vuelve a crear después de realizar este procedimiento. Asegúrese de realizar este procedimiento en todos los servidores de la granja de servidores.
  12. Asegúrese de que se ha actualizado el archivo Cache.ini. Por ejemplo ya no debe ser 1 si se ha actualizado la memoria caché.
  13. Haga clic en Inicio, seleccione programas, herramientas Administrativasy, a continuación, haga clic en Administración Central de SharePoint 3.0.
  14. Haga clic en la ficha operaciones y, a continuación, haga clic en estado del trabajo de temporizador en Configuración Global.
  15. En la lista de trabajos del temporizador, compruebe que el estado de la entrada de la Actualización de la configuración es correcta.
  16. En el menú archivo , haga clic en Cerrar.

miércoles, 16 de octubre de 2013

Setting the super user account on SharePoint 2010 and getting Access Denied errors afterwards

By default after installing SharePoint 2010 you will probably soon encounter the following two error messages in the Application log:
Object Cache: The super user account utilized by the cache is not configured. This can increase the number of cache misses, which causes the page requests to consume unneccesary system resources.
To configure the account use the following command ‘stsadm -o setproperty -propertyname portalsuperuseraccount -propertyvalue account -url webappurl’. The account should be any account that has Full Control access to the SharePoint databases but is not an application pool account.
Additional Data:
Current default super user account: SHAREPOINT\system


Object Cache: The super reader account utilized by the cache does not have sufficient permissions to SharePoint databases.
To configure the account use the following command 'stsadm -o setproperty -propertyname portalsuperreaderaccount -propertyvalue account -url webappurl'. It should be configured to be an account that has Read access to the SharePoint databases.
Additional Data:
Current default super reader account: NT AUTHORITY\LOCAL SERVICE

Source of the error is as the Technet documentation says:
By default, the Portal Super User account is the site’s System Account, and the Portal Super Reader account is NT Authority\Local Service. There are two main issues with using the out-of-box accounts.
  1. The first issue is that some items get checked out to System Account, so when a query that includes these items is made, the checked out version of the item is returned instead of the latest published version. This is a problem because it is not what a user would expect to have returned, so the cache has to make a second query to fetch the correct version of the file. This negatively affects server performance for every request that includes these items. The same problem would occur for any user who has items checked out, if that user’s account was set to be the Portal Super User account. This is why the accounts configured to be the Portal Super User and the Portal Super Reader should not be user accounts that are used to log into the site. This ensures that the user does not inadvertently check items out and cause problems with performance.
  2. The default Portal Super Reader account is NT Authority\Local Service, which is not correctly resolved in a claims authentication application. As a result, if the Portal Super Reader account is not explicitly configured for a claims authentication application, browsing to site collections under this application will result in an “Access Denied” error, even for the site administrator. This error will occur on any site that uses any feature that explicitly uses the object cache, such as the SharePoint Server Publishing Infrastructure, metadata navigation, the Content Query Web Part, or navigation.
So keeping these values on their default value on an intranet/extranet portal is not such a good idea. Let’s go ahead and set these two, according to the suggestions in the error message!
stsadm -o setproperty -pn portalsuperuseraccount -pv DOMAIN\user -url http://webappurl
stsadm -o setproperty -pn portalsuperreaderaccount -pv DOMAIN\user -url http://webappurl
iisreset
After doing so, you’re either done, or – in case you are in claims mode – will see Access Denied on all pages on the webapplication you set the accounts.

Moral of the story: if you are in claims mode, you will need to use the claims user name (i:0#.w|domain\user).

Relevant sections of the Technet article:

14. Make note of how the names for the Object Cache Super Reader and Object Cache Super User accounts are displayed in the User Name column. The displayed strings will be different depending on whether you are using claims authentication for the Web application.

  1. Copy the following code and paste it into a text editor, such as Notepad:
    $wa = Get-SPWebApplication -Identity "<WebApplication>" 
    $wa.Properties["portalsuperuseraccount"] = "<SuperUser>" 
    $wa.Properties["portalsuperreaderaccount"] = "<SuperReader>" 
    $wa.Update()
  2. Replace the following placeholders with values:
    • <WebApplication> is the name of the Web application to which the accounts will be added.
    • <SuperUser> is the account to use for the Portal Super User account as you saw it displayed in the User Column field mentioned in Step 14 of the previous procedure.
    • <SuperReader> is account to use for the Portal Super Reader account as you saw it displayed in the User Column field mentioned in Step 14 of the previous procedure.

Copy / Extract DLL from GAC

  • Open command prompt and go to c:\windows\assembly\GAC_MSIL
  • Required dll will be in form of a directory, change directory to to the dll (cd {dll name})
  • Check directory for folder name (dir)
  • Change directory to folder with long name
  • You will get the dll in this folder
  • Run copy command to copy to your desired directory
Example:

C:\WINDOWS\assembly\GAC_MSIL\MicrosoftDLLs\1.0.0.0__1d9c734559ff28a1
>copy *.dll c:\
BusquedaPoderesNotariales.dll
        1 file(s) copied.

jueves, 10 de octubre de 2013

Fixing “User Not Found” Error in SharePoint 2007 - MOSS

Sometimes you may receive “User not found” error with sharepoint pages when you try to access/edit page properties/settings in pages library or in content and stucture view (or from the ‘Page’ dropdown on the page editing toolbar).
The solution I found the best was to fix the user from the database directly (my apologies for being so blunt but this was the best that I could come up with :) )……cudent find any other solutions…….and this solution works really fine. No issues at all. 
When an active directory account is changed, SharePoint seems to hold on to the old account details. SharePoint has a separate table to manage user information named as “UserInfo” table.  That’s why, updating in ActiveDirectory user’s information won’t be reflected in SharePoint. Un-registering a user from SharePoint could be an option, but SharePoint will not delete user information but will only inactivate it. SharePoint does this for consistency within the database.
To resolve the problem, set tp_Deleted to 0 (zero) and tp_IsActive to 1.
Get the ID of the troubled user. To do that, go to ‘People and Groups’ and locate the user in the list. Put the mouse cursor on the user name…..just above the task bar on the left bottom of the screen, you will see the full URL with an ID appended at the end….note the ID. This is the ID of the user in the database.
Go to SQL query analyzer, select appropriate database and run the query:
Select SiteId from webs where author = <UserID>
Example:Select SiteId from webs where author = 12         
You will get the GUID for the site that this user has created. Copy this and run the following command:
SELECT * FROM UserInfo WHERE tp_SiteID = ‘<GUID>’ AND   tp_ID = <User ID>         
Example:SELECT * FROM UserInfo WHERE tp_SiteID = ‘E8379222-4598-407C-BF30-EAA0C278A2AF’  AND  tp_ID = 12
View the results of the query, if  tp_Deleted = 1 you should set it to 0 (zero) with an UPDATE command:
UPDATE UserInfo SET tp_Deleted = 0 where  tp_Id = <UserID> AND tp_SiteID = <GUID>
Example:UPDATE UserInfo SET tp_Deleted = 0 where tp_Id = 12 AND  tp_SiteID = ‘E8379222-4598-407C-BF30-EAA0C278A2AF’
Remember, at the end of the day, tp_Deleted should be set to 0 (zero) and tp_IsActive as 1.
———————————————————OR try this————————————————————————
1) Open SQL Server 2005 Management Studio and connect to the database using the command:
Use <database_name>
2) Create a new query and run the following SQL statement:
Update UserInfo Set tp_Deleted = 0   
WHERE  tp_ID  IN
(select tp_ID from UserInfo where tp_deleted <> 0 AND
(UserInfo.tp_ID in (select author from webs) OR
UserInfo.tp_ID in (select tp_Author from AllUserData)))
AND tp_login <> ‘<domain name>\<user name>’
Update UserInfo Set tp_IsActive = 1
WHERE  tp_ID IN
(select tp_ID from UserInfo where tp_IsActive = 0 AND
(UserInfo.tp_ID in (select author from webs) OR
UserInfo.tp_ID in (select tp_Author from AllUserData)))
AND tp_login <> ‘<domain name>\<user name>’
3) Restart IIS
 Hope this works for you……

miércoles, 9 de octubre de 2013

FIM User Profile Synchronization Service Issue Resolved

I have found that my sync was working fine until I selected "Synchronize BCS Connections" in the configuration and it broke everything. I had to delete the service application and reinstall the user profile application.
How I fixed the issue: Symptoms: User Profile Sync doesn’t work. Forefront Identity Manager Synchronization Service Hangs User Profile Synchronization Service and User Profile Service hangs on “Central Admin > Services on Server” Lots and lots of errors in event log.. amongst others
Event 22. The Forefront Identity Manager Service cannot connect to the SQL Database Server.
Event 6398. The description for Event ID 6398 from source Microsoft-SharePoint Products-SharePoint Foundation cannot be found.
Event 3. .Net SqlClient Data Provider: System.Data.SqlClient.SqlException: Could not find stored procedure 'RegisterService'.
Event 2. The Forefront Identity Manager Service could not bind to its endpoints.  This failure prevents clients from communicating with the Web services.
Event 6324. The server encountered an unexpected error and stopped.
ERR: MMS(1956): sql.cpp(5580): Query (select count(*) from [mms_management_agent]) performed with error
ERR: MMS(1956): sql.cpp(5633): Invalid object name 'mms_management_agent'.
ERR: MMS(1956): sql.cpp(5641): hrError: 0x80040e37, dwMinor: 208
ERR: MMS(1956): sql.cpp(5796): SQL error: 42S02, native: 208
BAIL: MMS(1956): sql.cpp(2897): 0x80040e37 
BAIL: MMS(1956): sql.cpp(4114): 0x80040e37 
ERR: MMS(1956): sql.cpp(5580): Query (select fixed_schema_version_number from [mms_server_configuration] ) performed with error
ERR: MMS(1956): sql.cpp(5633): Invalid object name 'mms_server_configuration'.
ERR: MMS(1956): sql.cpp(5641): hrError: 0x80040e37, dwMinor: 208
ERR: MMS(1956): sql.cpp(5796): SQL error: 42S02, native: 208
BAIL: MMS(1956): sql.cpp(2897): 0x80040e37 
BAIL: MMS(1956): sql.cpp(2738): 0x80040e37 
BAIL: MMS(1956): storeimp.cpp(2485): 0x80040e37 
BAIL: MMS(1956): storeimp.cpp(293): 0x80040e37 
ERR: MMS(1956): server.cpp(294): Failed to connect to the database Sync DB on ****\SHAREPOINT
BAIL: MMS(1956): server.cpp(295): 0x80040e37 
BAIL: MMS(1956): server.cpp(3518): 0x80040e37 
BAIL: MMS(1956): service.cpp(1528): 0x80040e37 
ERR: MMS(1956): service.cpp(977): Error creating com objects. Error code: -2147217865. This is retry number 3.
BAIL: MMS(1956): service.cpp(991): 0x80040e37 
Forefront Identity Manager 4.0.2450.5"


Looks familiar?
Diagnosis:
Um.. something is wrong with FIM?
Solution:
I have tried to compile the list of things I did to sort this out.
Rule of thumb, shut down the offending services and then make the changes. I assume you have the correct SPadmin accounts and all the services have the right accounts assigned.
Edit: 2010-10-28. If you do this and it still doesn't work, try deleting the User Profile Service Application and recreating it, as described in the following post http://www.harbar.net/articles/sp2010ups.aspx Look under the "Create the UPS service application" section.
I also had to stop most of the user profile services and do a restart after deleting and reinstalling the UPS service, also the new application pool that was created was set to 32 bit, which I had to change. Fair enough, took me 3 hours, but I did not have to reinstall SP.. again..


0. Reset IIS.. (just in case something is running around in memory)
PS D:\> iisreset


1. A wild FIM Service Account appears.. I choose you SPadmin account.
2. Now I assign “Full control” for my SPadmin account to the following folder “C:\Program Files\Microsoft Office Servers\14.0”
3. Open IIS manager and make sure that for all the application pools the “Advanced Settings>General>Enable 32-Bit Applications” = False.
4. Open SP CA > “Services on Server” and make sure that “User Profile Synchronization Service” and “User Profile Service” is stopped. If they are just hanging, do this:
Open PowerShell on SP server.
a. Type:
get-spserviceinstance
Name                             Status   Id
--------                         ------   --
Managed Metadata Web Service     Online   82880b37-2cff-4a3c-94ca-922bb739ff27
User Profile Synchronization ... Provi... 03f49dd6-658e-44cd-a6f0-21c7560242ab
Business Data Connectivity Se... Online   901d17ff-471a-4557-80eb-befac3ffb396


b. Next, locate the GUID for the user profile synchronization service (it'll probably show a status of 'provisioning' in PowerShell) and use the following command:
c.
stop-spserviceinstance [userprofilesynchronizationservice GUID]


This will eventually stop the service and the status of the service on the SharePoint Manage services on server page will show a status of 'stopped'.
Also, the two Forefront services in the Windows Services console should be set back to a status of disabled.
5. Login as farm account
6. Backup the User Profile DB and the User Profile Sync DB
7. Stop the SharePoint 2010 Timer service:

PS D:\> net stop sptimerv4


8. Delete the data in the Sync DB using the following PowerShell script:

PS D:\> Get-SPDatabase


9. Copy the GUID associated with the User Profile Sync DB in the command line below

PS D:\> $syncdb=Get-SPDatabase -Id <GUID of User Profile Sync DB>


10. Execute these commands, in exactly the following order. This is not a script. So please cut and paste each of these commands one by one.

PS D:\> $syncdb.Unprovision()
PS D:\> $syncdb.Status='Offline'
PS D:\> Get-SPServiceApplication
#Copy the GUID associated with the User Profile Service and paste it after "Id" in the next command:

PS D:\> $upa=Get-SPServiceApplication -Id <GUID of User Profile Service
PS D:\> $upa.ResetSynchronizationMachine()
PS D:\> $upa.ResetSynchronizationDatabase()


11. Provision the Sync DB:

PS D:\> $syncdb.Provision()


12. Add the User Profile Synchronization service account (farm account) as the dbowner on the Sync DB (using SQL Server Management Studio).
13. Start the SharePoint 2010 Timer service

PS D:\> net start sptimerv4


14. Go to SP CA > Application Management > Manage Service Applications > Click on the right next to “User Profile Service” (Do not open it, just select it) > Administrators (on the ribbon) > Make sure your chosen account has full control
15. Start the User Profile Synchronization Service in the Central Administration UI.
16. After the User Profile Synchronization Service is started, reset IIS.
PS D:\> iisreset


17. Create connections to data sources in the Central Administration UI.
18. Run full user profile synchronization.
19. Open C:\Program Files\Microsoft Office Servers\14.0\Synchronization Service\UIShell\ miisclient.exe
I wish I could tell you that “Do this and it will work again” but I cannot guarantee this will solve your problem, it solved mine however.(this solution is pasted together from about 5 forums)
*Edit: see what happens if you talk to the right people*
Thank you Donald Farmer and Peter Willmot for pointing me in the right direction.. thank you
http://www.harbar.net/articles/sp2010ups.aspx
And of course, thank you Spencer Harbar for all the awesomeness

Assign Administration of a Service Application with PowerShell

$serviceapp = Get-SPServiceApplication <guid>
$security = Get-SPServiceApplicationSecurity
$serviceapp -Admin $principalUser1 = New-SPClaimsPrincipal -Identity "<domain\user>" -IdentityType WindowsSamAccountName Grant-SPObjectSecurity
$security -Principal $principalUser1 -Rights "Full Control" Set-SPServiceApplicationSecurity $serviceapp -ObjectSecurity $security -Admin

martes, 8 de octubre de 2013

Sharepoint 2010 + Infopath 2010: The operation could not be completed


En un formulario de Infopath, al crear una nueva conexión de extracción de datos, se presentó el siguiente mensaje de error:


En mi escenario, se creó un solo sitio de Project Web Application y un sitio secundario con una biblioteca de formularios. El mensaje de error se presenta cuando no se encuentra creada una colección de sitios en el sitio raiz de IIS.

Para solucionar el problema ejecutar el siguiente procesimiento:

- Utilizar la consola de Administración Central de Sharepoint para crear una colección de sitios en el sitio raiz de IIS (Sitio Web por Defecto).


- Crear nuevamente la conexión de recepción de información en el formulario de Infopath.


lunes, 7 de octubre de 2013

Auditing - A Built-in Feature of SharePoint

Introduction

In this article we explore the Audit feature of SharePoint 2010. This is a built-in feature and provides a great amount of flexibility for Administrators and Developers.

What is Auditing in SharePoint?

Auditing involves Activity Tracking inside the SharePoint environment. The auditing reports generated can be used by Administrators or Managers to determine the usage of SharePoint resources.
By enabling Auditing we can track activities like:
  • List Access
  • Library Access
  • Opening of Documents
  • Editing Items
  • Check In / Check Out
  • Copying / Moving / Deleting items
  • Searching
  • Editing Permissions
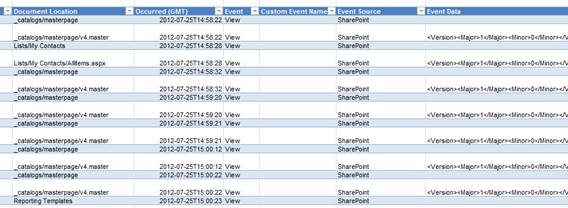
Following is a sample of how a detailed audit report looks like:

Under the hood, SharePoint uses events and a SQL Server table to retrieve and save the audit entries. Following are the topics we are discussing in this article:
  • Enable Audit
  • View Audit Entries
  • Custom Report
  • Server Object Models
  • Audit Event Types
  • Writing custom Audit entries

Enable Audit

We can enable audit for a site collection from the Site Settings > Audit Settings link.

From the Configure Audit Settings page opened, specify the events to be audited.

Once you have enabled Audit you can go ahead and try accessing/modifying existing list/library items. These activities should trigger the Audit entry creation.
Note: Please note that in real world scenarios you should only enable the events required. Too many event auditing queues causes more work to the server and can degrade the performance.

View Audit Entries

Now we can proceed to view the audit entries just created. You can use the Audit log reports from the Site Settings page.

In the appearing page View Auditing Reports you can see there are various categories of reports like:
  • Content Modification
  • Content Viewing
  • Deletion
  • Policy Modification etc.
Click on the Content Viewing as this time we are interested in only Viewing reports. In the appearing dialog, enter the document library where you want to save the report. Click OK to generate the report. (The report is a document and hence a document library is required to save it.)

Click on the Click here to view report link to view the report. It should open in an XLSX document. There are two tabs on the XLSX file – Summary and Detailed.

Custom Report

Now we can try using the Custom Report generation. This option is useful when we need to get a report based on / or a combination of:
  • Custom List
  • Particular user
  • Date Range
Please note that under the hood SharePoint has saved all the event records. The custom report will be filtering the records based on user selection.
To generate the custom report, go to Site Settings > Audit log reports > Run a custom report.

You should get the following page with filtering options:

You can choose Save Location, List, Dates, Users, and Events and click the OK button to generate the report as an XLSX file.

Server Object Models

The good thing is that we can use the Server Object Model to interact with Audit. Following are some of the important audit classes inside theMicrosoft.SharePoint namespace.
  • SPAudit
  • SPAuditEntry
  • SPAuditEventType
  • SPAuditQuery

SPAudit

SPAuditis the main class which can be used to access the audit settings for the associated object. The server object models like SPSite, SPWeb, SPList,SPDocumentLibrary contain a property named Audit which represents the underlying SPAudit settings.
TheSPAudit class contains methods for the following operations:
  • GetAuditEntries()to get the audit entries
  • Update()to update modifications to audit settings
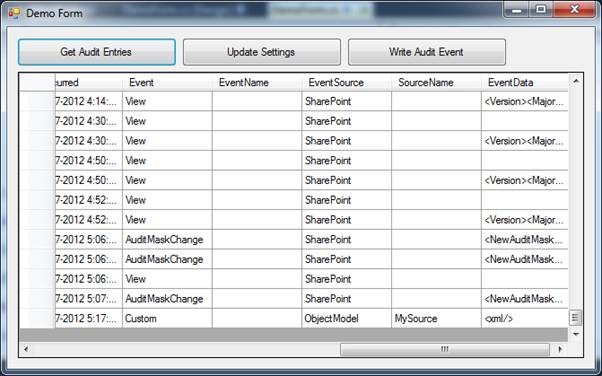
Following is the code to get audit entries:
private void GetAuditEntriesButton_Click(object sender, EventArgs e)
{
    SPSite site = new SPSite("http://localhost");
    SPAudit audit = site.Audit;
    var collection = audit.GetEntries();
}
Following is the code to update audit settings for the site:
private void UpdateButton_Click(object sender, EventArgs e)
{
    SPSite site = new SPSite("http://localhost");
    SPAudit audit = site.Audit;
    audit.AuditFlags = SPAuditMaskType.None;
    audit.Update();
}
The above code clears all Audit Events by setting the AuditFlags property to None. After executing the code you can revisit the Site Collection Audit Settings to see that all the events are unchecked.
Note: You can use the SPAudit class to update audit settings across multiple site collections in one shot. Plus you can automate clearing the audit entries using the DeleteEntries() method.

SPAuditEventType

The enumeration SPAuditEventType is needed to specify the event type of the audit entry. The enumeration contains the following members:
public enum SPAuditEventType
{
    AuditMaskChange = 14,
    CheckIn = 2,
    CheckOut = 1,
    ChildDelete = 7,
    ChildMove = 0x10,
    Copy = 12,
    Custom = 100,
    Delete = 4,
    EventsDeleted = 50,
    FileFragmentWrite = 0x11,
    Move = 13,
    ProfileChange = 6,
    SchemaChange = 8,
    Search = 15,
    SecGroupCreate = 30,
    SecGroupDelete = 0x1f,
    SecGroupMemberAdd = 0x20,
    SecGroupMemberDel = 0x21,
    SecRoleBindBreakInherit = 40,
    SecRoleBindInherit = 0x27,
    SecRoleBindUpdate = 0x26,
    SecRoleDefBreakInherit = 0x25,
    SecRoleDefCreate = 0x22,
    SecRoleDefDelete = 0x23,
    SecRoleDefModify = 0x24,
    Undelete = 10,
    Update = 5,
    View = 3,
    Workflow = 11
}

SPAuditQuery

SPAuditQuery represents the class to do filter fetching of audit entries. It provides the following methods and properties:

You can see that the methods are similar to the options available in the custom report generation page. The sample code using SPAuditQuery is included in the source attachment.

Writing custom Audit entries

Occasionally we need to write custom audit information for a SharePoint solution. In this case we can reuse the Audit Server Object Model mechanism to perform the same.
Following is the code that writes to the Audit entry:
private void WriteAuditEvent_Click(object sender, EventArgs e)
{
    SPSite site = new SPSite("http://localhost");
    SPAudit audit = site.Audit;
    audit.WriteAuditEvent(SPAuditEventType.Custom, "MySource", "<xml/>");
}
After execution you can see the new entry through invocation of the GetAuditEntries()method. You can use the associated application to view the same.

Remark on Database Usage

The audit entries are stored inside the SharePoint database. You can view this database inside the SharePoint SQL Server instance. The table storing the Audit records is AuditData. For inserting your own records into the table, it is recommended to use the Server Object Model.

Summary

In this article we have explored the Audit feature of SharePoint. I believe now you will agree that it is a good feature that saves a lot of our time that otherwise would have been invested in writing events and persisting code.
The associated code contains the examples we have discussed.