Mostrando entradas con la etiqueta SharePoint 2010. Mostrar todas las entradas

miércoles, 1 de julio de 2015

Cómo crear un Timer Job de SharePoint desde Visual Studio 2010

La creación de Timer Jobs en SharePoint es una potente herramienta para el desarrollo de aplicaciones personalizadas en SharePoint, gracias a los cuales, podemos ejecutar de forma desatendida y planificada el código que deseemos, y además, ejecutarlo fuera del IIS (interesante para código que pueda necesitar ejecuciones de larga duración). El presente artículo describe cómo crear un Timer Job de SharePoint 2010 paso a paso con Visual Studio 2010.

Un Timer Job es una tarea ejecutable que corre sobre uno o varios servidores de forma desatendida en base a una planificación, un concepto similar a los Jobs del Agente de SQL Server. Los Timer Jobs resultan de gran utilidad para descargar al IIS de las tareas de larga ejecución y de las tareas periódicas, que pasarán a ser gestionadas por el servicio SharePoint 2010 Timer. Existen multitud de Timer Jobs que vienen OOB con el propio producto, que varían en función de la edición de SharePoint que se trate, y adicionalmente, podemos desarrollar nosotros nuestros propios Timer Jobs, por lo que en consecuencia también podremos encontrar muchos Timer Jobs correspondientes a aplicaciones de terceros.
Cada Timer Job tiene un alcance (Scope), es decir, un tipo de objeto que indica a qué nivel jerárquico trabajará el Timer Job, existiendo tres posibilidades:
  • La Granja.
  • Un Servidor.
  • Una Base de Datos de Contenido.
Es decir, un Timer Job se ejecutará una vez por Granja, una vez por Servidor, ó una vez por Base de Datos de Contenido. De hecho, esto queda reflejado en los tres posibles valores de la enumeración SPJobLockType:
  • Job. El Job se ejecuta una vez por Granja. Un ejemplo sería el Job CEIP data collection job.
  • None. El Job se ejecuta una vez por Servidor. Cada servidor de la Granja tiene/posee (no se muy bien cómo describirlo) una Instancia del Job. Un ejemplo, sería el Config Refresh job.
  • Content Database. El Job se ejecuta una vez por Base de Datos de Contenido. Un par de ejemplos serían el Job de Immediate Alerts Jobs y el Job de Recycle Bin cleanup.
Para crear un Timer Job, deberemos crear una clase del tipo SPJobDefinition, la cual deberá tener un par de constructores, además de sobrescribir el método Execute(). Finalmente, necesitaremos una Característica (Feature), para a través de los Eventos de Activación y Desactivación de la misma (FeatureActivated y FeatureDeactivating) registrar y deregistrar nuestro Timer Job en la Granja de SharePoint sobre la que estemos desplegando nuestra Solución.

Creación de un Timer Job paso a paso con Visual Studio 2010

En el siguiente ejemplo, vamos a crear paso a paso un Timer Job que se ejecutará una vez por Granja (Scope Farm), utilizando Visual Studio 2010.
Crearemos un nuevo Proyecto en Visual Studio 2010 de tipo Empty SharePoint Project, asegurándonos de seleccionar el Net Framework 3.5 y asignaremos el nombre que deseemos para el Proyecto (en nuestro caso, lo llamaremos MyTimerJob). En el Wizard para la creación del Proyecto, seleccionaremos la opción Deploy as a farm solution.
Seguidamente crearemos una nueva clase pública (no olvidar añadir el modificador de acceso public) que herede de SPJobDefinition, para lo cual deberemos crear un par de constructores y sobrescribir el método Execute(), además de añadir al menos un par de sentencias using.
Seguidamente crearemos una nueva clase pública que herede de SPJobDefinition
De los dos constructores:
  • El constructor por defecto no lo modificaremos.
  • En el otro constructor, llamaremos al constructor base, pero deberemos especificar el nombre del Job (Title). También deberemos especificar el tipo de bloqueo del Job utilizando la enumeración SPJobLockType, lo cual está relacionado con el alcance (Scope) del propio Job (lo comentamos al principio de este artículo). En nuestro caso de ejemplo, como deseamos crear un Job para ejecutarse una vez por Granja,utilizaremos el tipo de bloqueo SPJobLockType.Job. Y por último, para el parámetro Server del constructor base, deberemos especificar una instancia de la clase SPServer si el Job tiene de alcance un Servidor (Scope Server) o null si el Job no está asociado a ningún Servidor (en nuestro caso especificaremos null).
Por otro lado, el método Execute() recibe como parámetro un objeto de tipo GUID, el cual, cuando el alcance (Scope) del Job es la Base de Datos de Contenido representará una referencia a la Base de Datos de Contenido sobre la que se está ejecutando la instancia actual del Job. En el resto de casos (como en el nuestro), será null.

Despliegue del Timer Job

Una vez que ya hemos desarrollado la clase de nuestro Timer Job, tenemos que preparar su despliegue. Para ello, añadiremos una Característica (Feature) a nuestro Proyecto de Visual Studio 2010, la configuraremos con un alcance a nivel de Aplicación Web (Scope Web Application), y añadiremos un Event Receiver a nuestra Característica, donde incluiremos el código para el despliegue y eliminación de nuestro Timer Job (FeatureActivated y FeatureDeactivating).
Añadiremos una Característica (Feature) a nuestro Proyecto, sobre la que añadiremos un Event Receiver
A continuación podemos ver un código de ejemplo para la activación y desactivación de un Timer Job.
FeatureActivated y FeatureDeactivating

Despedida y Cierre

Hasta aquí llega el presente artículo, en el cual hemos intentado presentar la forma de desarrollar un Timer Job de SharePoint 2010 con Visual Studio 2010, una tarea que puede resultarnos de utilidad en multitud de ocasiones. Por último, antes de acabar, aprovecho para añadir algunos enlaces de interés, para quien desee ampliar más información:

jueves, 7 de noviembre de 2013

SharePoint 2010: Forzar la apertura de documentos en cliente

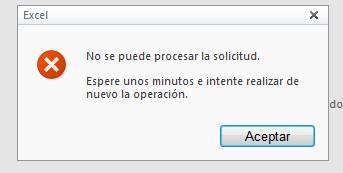
Al abrir un fichero Excel desde SharePoint nos puede aparecer un error del tipo “No se puede procesar la solicitud. Espere unos minutos e intente realizar de nuevo la operación”. Esto se debe a que se han activado las características empresariales habilitándose la funcionalidad de visualización de ficheros Excel desde Excel Services. El problema es que además de estar habilitado debemos tener configurada una aplicación de servicio de Excel Services.

clip_image002

Podremos entonces forzar que los documentos se abran en cliente indicándolo para una biblioteca determinada o forzar la apertura en cliente en toda la colección de sitios.

Para forzar la apertura en cliente desde una biblioteca de documentos:

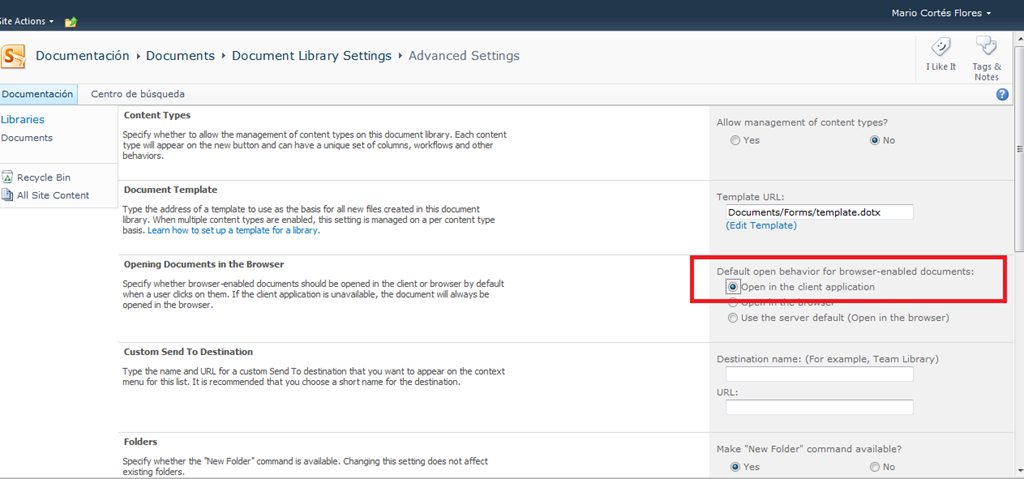
  • Desde la configuración de la biblioteca de documentos > Configuración avanzada.
  • En la sección “Abrir documento desde el explorador” seleccionar “Abrir en aplicación cliente”.

image

Para forzar la apertura en cliente en toda la colección de sitios activaremos la característica de colección de sitios “Abrir los documentos en aplicaciones cliente de forma predeterminada”.

  • Configuración de sitio (nivel superior) > Características de la colección de sitios > activamos la característica con el título “Abrir los documentos en aplicaciones cliente de forma predeterminada”.

clip_image002[4]

martes, 23 de julio de 2013

Habilidades que necesita un buen arquitecto de SharePoint:

Core
  • IIS 6/7+ 
  • Windows Server 2003/2008/2012
  • DNS/WINS (Name Resolution)
  • TCP/IP & other network considerations
  • SQL Server 2005+ Advanced Administration (Backup, Monitoring, Logshipping or Database Mirroring) 
  • Basic Firewall rules and Proxy
  • IT Infrastructure Design
  • Hardware Acquisition (RAM, CPU, Disk I/O, and other hardware considerations)
  • Performance Monitoring
  • Capacity Planning 
  • Growth Management
  • Workflow (Windows Workflow Foundation)
  • Client Troubleshooting & Support: IE, Firefox, Safari, Office, 2010, etc...
  • HTML & Client side scripting (Javascript, AJAX, DHTML, XSL, XSLT, XHTML)
  • Exchange and SMTP integration (Inbound and Outbound email including contact objects)
  • High Availability: Microsoft Cluster Services, Windows Network Load Balancing
  • Storage: Appliances, HBAs, SANs, Archive Storage
  • Backup Solutions: Various Tape, Hardware and software snapshots, software nearline and offline storage (soon to add SCDPM)
  • Hardware load balancing, ISA Secure Web Publishing
  • IAG (Internet Application Gateway) Whale Communications
  • Single Sign on integration 
  • Connection Monitoring & Troubleshooting (ADO.NET, Web Services, CDO)
  • Global Deployments - Multi farm deployments
  • Dev, Test, Staging, Production - Staged deployments
  • MOF, ITIL, MSF Frameworks and strong understanding of the development life cycle
  • Virtualization - Hyper-V, VMWare
Solutions:
  • Internet Publishing
  • Internet Community Portal
  • Intranet Central Search Portal
  • Intranet Departmental Dashboard Portal
  • Intranet Collaboration
  • Business Process Management
  • Extranet Collaboration
  • Document Management
  • Records repository
  • BI Solutions
  • Search Center or Intranet and Internet Search Solutions
  • Reports Center
  • Mobile Solutions
  • Remote employee solutions
  • Multi lingual solutions
  • Project Server
  • Web 2.0 Solution: Blogs, Wikis, Social Networking (Profiles & My Sites)
Extended
  • AD (Group Policies, Security Groups, DLs, Contacts, authentication, and attributes for profile import) 
  • Desktop Management (IE settings, Office deployment, storage and collaboration considerations)
  • SCOM Systems Center Operations Manager of performance and system health of servers and dependencies 
  • WAN and Network performance testing and considerations, (minimum performance levels) caching
  • File Services & (extremely light... policy SMS and Patching considerations)
  • Antivirus management solutions like Forefront
  • Presence Integration (LCS, Office Live Communication Server, SMTP and SIP)
  • Understanding and supporting Dev: ASP.NET, C#, Assemblies, GAC, Bin, web.config, web parts, web part connections, missing assemblies
  • MIIS in cross forest or resource forest scenarios or dynamic security groups
  • Migration Skills: Public Folders, Documentum, Lotus Notes, CMS, WebSphere
Interop and Integration
  • Office Interoperability (Word, Excel, Access, PowerPoint, Outlook)
  • Project Server deployment
  • Microsoft Dynamics (CRM, ERP, AXAPTA, GreatPlains, etc...)
  • Infopath forms troubleshooting and basic design skills (XML, HTML)
  • Visio integration
  • Biztalk
  • SharePoint Designer for workflows, CSS, Design, etc... 
  • Reporting and Analysis Integration: SQL Reporting Services, SQL Analysis Services
  • SAP integration with Duet
  • BDC Siebel web services integration
  • Oracle Financials integration in BDC and Excel Services
  • Other ADO.NET BDC connections: includes various CRM, ERP, DBMS
  • Commerce integration in Internet sites
  • Web Services integration
  • Documentum, WebSphere
  • Search/Indexing Integration
  • Data warehouses RDBMS
  • Single Sign on solutions and integration with client certificates, smart cards, and 2 factor auth
  • N tiered web apps, web services, and stores
  • Samba and NFS?

viernes, 31 de mayo de 2013

Solution - An unhandled exception ocurred in Silverlight Application in SharePoint 2010

Mientras trabaja con sitios de SharePoint, muy a menudo hemos creado las bibliotecas de documentos y listas usando la función de "Más opciones" presentan en el menú "Acciones del sitio" en la parte superior izquierda. Mientras trabajaba en uno de mis sitios de SharePoint hoy, empecé frente a que un raro temas de repente. El sitio no me permitió crear cualquier novedad en uno de mis sitios de sub y un mensaje de error como "se produjo una excepción no controlada en la aplicación de Silverlight" como en la captura de pantalla siguiente.moss-error
He reiniciado por PC, borra la caché, cookies y otras cosas pero todo en vano. Recuerdo la creación de una nueva biblioteca pocos meses atrás y no había tocado desde entonces. Tocó el violín a través de la Administración Central y a continuación es la solución a los mismos:
  • Ir a la Administración Centralmoss-1
  • Ir a la administración de aplicaciones > administrar aplicaciones Webmoss-3
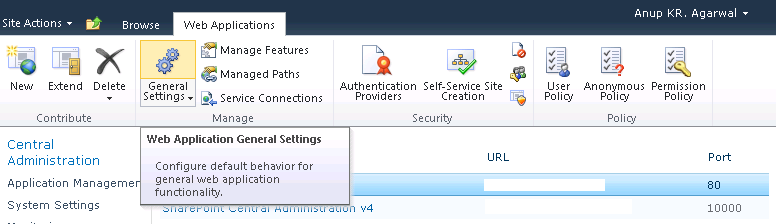
  • Seleccione la colección de sitios de SharePoint donde te enfrentas a la cuestión y haga clic en Configuración General de la cintamoss-5
  • Sistema de Validación de seguridad de la Página Web en "On" y guardar los cambios.moss-6
  • Actualice la página del sitio de SharePoint y listo.

lunes, 20 de mayo de 2013

Sharepoint 2010 - Borrado accidental de site de IIS


Si accidentalmente se borra un site de SharePoint en IIS, sigamos estos pasos:

  1. Bajar el nodo en el web load balancer appliance (CISCO ACE)
  2. Entrar en Manage Services on Server (http://centraladministration/_admin/Server.aspx)
  3. Seleccionar el server en donde se borró el site
  4. Reiniciar el servicio Microsoft SharePoint Foundation Web Application

martes, 12 de marzo de 2013

Plan automatic password change SharePoint 2010

Recommendation: - Use SharePoint Foundation managed accounts when possible. You can use managed accounts to control the passwords for the following things:
  • Central administration
  • Timer service
  • Service applications
  • Application pools

 To synchronize passwords automatically you can register managed accounts and configure SharePoint Foundation to change the managed accounts’ passwords according to a schedule. SharePoint Foundation automatically generates a new password, updates the password in Active Directory Domain Services (AD DS), and propagates the changes to other servers in the farm
To simplify password management, the automatic password change feature enables you to update and deploy passwords without having to perform manual password update tasks across multiple accounts, services, and Web applications.
 You can configure the automatic password change feature to determine if a password is about to expire and reset the password using a long, cryptographically-strong random string.
To implement the automatic password change feature, you have to configure managed accounts.
1.1) Configuring managed accounts by Central Administration
.1 Verify that the user account that is performing this procedure is a site collection administrator.
.2  On the Central Administration Web site, select Security.
.3  Under General Security, click Configure managed accounts.
.4  On the Managed Accounts page, click Register Managed Account.
.5  In the Account Registration section of the Register Managed Account page, enter the service account credentials.
.6  In the Automatic Password Change section, select the Enable automatic password change check box to allow SharePoint Foundation 2010 to manage the password for the selected account. Next, enter a numeric value that indicates the number of days prior to password expiration that the automatic password change process will be initiated.
.7  In the Automatic Password Change section, select the Start notifying by e-mail check box, and then enter a numeric value that indicates the number of days prior to the initiation of the automatic password change process that an e-mail notification will be sent. You can then configure a weekly or monthly e-mail notification schedule.
.8 Click OK.
2.2)   Configure automatic password change settings by Central Administration
1) Verify that the user account that is performing this procedure is a site collection administrator.
2) On the Central Administration Web site, click Security.
3) Under General Security, click Configure password change settings.
4) In the Notification E-Mail Address section of the Password Management Settings page, enter the e-mail address of an individual or group to be notified of any imminent password change or expiration events.
5)If automatic password change is not configured for a managed account, enter a numeric value in the Account Monitoring Process Settings section that indicates the number of days prior to password expiration that a notification will be sent to the e-mail address configured in the Notification E-Mail Address section.
6)In the Automatic Password Change Settings section, enter a numeric value that indicates the number of seconds that automatic password change will wait (after notifying services of a pending password change) before initiating the change. Enter a numeric value that indicates the number of times a password change will be attempted before the process stops.
7) Click OK.
2.3)   Troubleshooting automatic password change
2.3.1)To correct for a password mismatch
  • Verify that you meet the following minimum requirements (http://technet.microsoft.com/en-us/library/ff607596.aspx)
  • On the Start menu, click All Programs.
  • Click Microsoft SharePoint 2010 Products.
  • Click SharePoint 2010 Management Shell.
  • From the Windows PowerShell command prompt, type the following ENTER:
       Set-SPManagedAccount [-Identity] <SPManagedAccountPipeBind> -   ExistingPassword <SecureString> -UseExistingPassword $true
2.3.2) To resolve a service account provisioning failure
a)   If service account provisioning or re-provisioning fails on one or more servers in the farm, check the status of the Timer Service. If the Timer Service has stopped, restart it.
Consider using the following Stsadm command to immediately start Timer Service administration jobs:
stsadm -o execadmsvcjobs
b) If restarting the Timer Service does not resolve the issue, use Windows PowerShell to repair the managed account on each server in the farm that has experienced a provisioning failure
  • Verify that you meet the following minimum requirements
  • (http://technet.microsoft.com/en-us/library/ff607596.aspx)
  • On the Start menu, click All Programs.
  • Click Microsoft SharePoint 2010 Products.
  • Click SharePoint 2010 Management Shell.
  • From the Windows PowerShell command prompt, type the following:
        Repair-SPManagedAccountDeployment
 c)  If the preceding procedure does not resolve a service account provisioning failure, it is likely because the farm encryption key cannot be decrypted.     
        If this is the issue, use Windows PowerShell to update the local server pass phrase to match the pass phrase for the farm.
  • Verify that you meet the following minimum requirements:  (http://technet.microsoft.com/en-us/library/ff607596.aspx
  • On the Start menu, click All Programs. Click Microsoft SharePoint 2010 Products. 
  • Click SharePoint 2010 Management Shell. 
  • From the Windows PowerShell command prompt, type the following
          Set-SPPassPhrase -PassPhrase <SecureString> -ConfirmPassPhrase <SecureString> -LocalServerOnly $true
2.3.3) Imminent password expiration: - If the password is about to expire, but automatic password change has not been configured for this account, use Windows PowerShell to update the account password to a new value that can be chosen by the administrator or automatically generated. After you have updated the account password, make sure the Timer Service is started and the Administrator Service is enabled on all servers in the farm. Then, the password change can be propagated to all of the servers in the farm.
  • Verify that you meet the following minimum requirements: (http://technet.microsoft.com/en-us/library/ff607596.aspx)
  • On the Start menu, click All Programs. Click Microsoft SharePoint 2010 Products.
    • Click SharePoint 2010 Management Shell.
    • To update the account password to a new value chosen by the administrator, from the Windows PowerShell command prompt, type the following
                             Set-SPManagedAccount [-Identity] <SPManagedAccountPipeBind> -Password <SecureString>
                      0  To update the account password to a new automatically generated value, from the Windows PowerShell command prompt, type the following:
                           Set-SPManagedAccount [-Identity] <SPManagedAccountPipeBind> -AutoGeneratePassword $true
         Note: - If you need to change the farm account to a different account, use the  following Stsadm command:
                      stsadm.exe -o updatefarmcredentials –userlogin DOMAIN\username –password password

lunes, 11 de marzo de 2013

Step-by-Step: Provisioning the Search Service Application

Provisioning the Search Service Application
Open SharePoint 2010 Central Administration.
Select Managed service applications under Application Management.
Select New | Search Service Application on the ribbon user interface.
CA
On the Create Search Service Application dialog specify the name for the new Search Service Application or accept the default name, usually Search Service Application 1.
Provide a name for the new Search Administration Web Service Application Pool or use an existing Application Pool.
Provide a name for the new Search Administration Site Settings and Query Web Service or use an existing Application Pool.
CA2
Click OK on the new Create New Search Service Application dialog to provision the new service application
Once the Search Service Application has been successfully provisioned on the server farm you will have a 1x1x1 topology or otherwise 1 Search Administration, 1 Crawl, and 1 Query component on the machine hosting SharePoint 2010 Central Administration and all associated databases on the default database server.
Topology
NOTES
The Search administration (Admin) topology does not scale out - there can be on one (1) search administration component and one (1) search administration database per Search Service Application.
The Crawl topology can be scaled out by adding Crawl Components or Crawl Databases.  Crawl Components can have a many-to-one relationships with Crawl Databases.
The Query topology can be scaled out by adding Property Databases or by adding Query Components.  Index Partitions subdivide the full-text index.   A new Query Component can either be the first component in a new partition (see above illustration (Query Component 0)) or an additional component in an existing partition.
In the public beta, Index Partitions have a many-to-one relationship with Property Databases.
Moving Query Components
Open SharePoint 2010 Central Administration.
Select Managed service applications under Application Management.
On the Services Applications page, select the Search Service Application.
On the Search Administration page, locate the Search Application Topology section and click Modify.
On the Topology for Search Service Application: Search Service Application page, locate the Index Partition category. (The default Query Component is typically named Query Component 0). Click Query Component 0 and then click Edit Properties.
On the Edit Query Component page, select a server in the topology from the Server drop-down list and then click OK.  This will move the Query Component to the selected server.
EditQueryComponent
Creating Mirror Query Components
When you create a Mirror Query Component, you create a replica of the Index Partition on another server.  You will typically create new Mirror Query Components when you need to increase throughput or availability.
Open SharePoint 2010 Central Administration.
Select Managed service applications under Application Management.
On the Services Applications page, select the Search Service Application.
On the Search Administration page, locate the Search Application Topology section and click Modify.
On the Topology for Search Service Application: Search Service Application page, locate the Index Partition category. (The default Query Component is typically named Query Component 0). Click Query Component 0 and then click Add Mirror.
AddMIrror
On the Add mirror query component dialog, select a server in the topology from the Server drop-down list and then click OK.
AddMirrorComponent
Repeat the steps for each server in the topology as required.
Creating Query Components
When you create a new Query Component, you create a new Index Partition which subdivides the full-text index.  You will typically create new Query Components and Index Partitions when the total number of items in your Index exceed the recommend scale for a single Index Partition, or when you need to increase throughput or availability.
Open SharePoint 2010 Central Administration.
Select Managed service applications under Application Management.
On the Services Applications page, select the Search Service Application.
On the Search Administration page, locate the Search Application Topology section and click Modify.
On the Topology for Search Service Application:  Search Service Application 1, select New | Index Partition and Query Component.
Topology2
On the Add Query Component dialog, select a server in the topology from the Server drop-down list, Property Database, and specify the location of the Index Partition.
AddQueryComponent
Click OK on the Add Query Component dialog to save the changes and create the new Query Component.
Creating Crawl Components
You will typically create new Crawl Components to improve the overall crawl speed and subsequently freshness of the content and to improve availability.
Open SharePoint 2010 Central Administration.
Select Managed service applications under Application Management.
On the Services Applications page, select the Search Service Application.
On the Search Administration page, locate the Search Application Topology section and click Modify.
On the Topology for Search Service Application:  Search Service Application 1, select New | Crawl Component.
Topology2
On the Add Crawl Component dialog specify the server where the Crawl Component will be hosted, the Crawl Database to which the Crawl Component will be associated, and the temporary location on the Index.
AddCrawlComponent
Click OK on the Add Crawl Component dialog to save the changes and create the new Crawl Component.
Creating Crawl Databases
You will typically create new Crawl Databases to improve the overall crawl speed and subsequently freshness of the content and in correlation to the creation of new Crawl Components.
Open SharePoint 2010 Central Administration.
Select Managed service applications under Application Management.
On the Services Applications page, select the Search Service Application.
On the Search Administration page, locate the Search Application Topology section and click Modify.
On the Topology for Search Service Application:  Search Service Application 1, select New | Crawl Database.
Topology2
On the Add Crawl Database dialog specify the database server where the Crawl Database will reside, the database name, and optionally the select whether the Crawl Database will be dedicated to hosts specified in Host Distribution Rules.
Host Distribution Rules are useful in specifying:
1. A particular host that is processed by a one or more Crawler Databases.
2. A particular host is processed by only one or more Crawler Database.
Host Distribution Rules are commonly used to support large and complex content corpuses that require horizontal scale (scale out) topologies.
AddCrawlDB
Click OK on the Add Crawl Database dialog to save the changes and create the new Crawl Database.
Creating Property Databases
You will typically create new Property Databases to support the horizontal scale (scale out) of the Query Component(s).
Open SharePoint 2010 Central Administration.
Select Managed service applications under Application Management.
On the Services Applications page, select the Search Service Application.
On the Search Administration page, locate the Search Application Topology section and click Modify.
On the Topology for Search Service Application:  Search Service Application 1, select New | Property Database.
Topology2
On the Add Property Database dialog specify the database server where the Property Database will reside and the database name.
AddPropertyDatabase
Click OK on the Add Property Database dialog to save the changes and create the new Property Database.

viernes, 8 de marzo de 2013

Topología Sharepoint 2010

Este post explica brevemente los diferentes topologías de granja de SharePoint 2010 y explica los roles involucrados en esa topología. SharePoint 2010 se puede implementar en un solo servidor o varios servidores. Los roles involucrados en SharePoint 2010 de granja son:
  • Web server role
  • Application server role
  • Database server role
En pequeñas granjas típicamente estos roles pueden estar en un uno o dos servidores.

Web server role:
1. Aloja las páginas web, servicios web y web parts para procesar las solicitudes.
2. Pasa las peticiones a los servidores de aplicación adecuados.

Application server role:
1. Las funciones del servidor de aplicación están relacionados con los servicios que se encuentran en SharePoint
2. Cada servicio de aplicación puede residir en un servidor de aplicaciones dedicado
3. Agrupar los servicios relacionados basado en el uso
Los componentes típicos en el servidor de aplicaciones
Query component · Crawl component · Search administration · User profile service · Business Data connectivity · Web Analytics
Los servicios asociados a los componentes anteriores se pueden compartir en varias granjas:.
Los servicios típicos que se asocia con las aplicaciones de servicios en el servidor de aplicaciones
- Excel Calculation service - Business Data Connectivity - SharePoint server search - Performance point service - User profile service - Web Analytics service - Visio graphics service
Database server role: Todas las bases de datos se puede implementar en un solo servidor en una granja pequeña. En grandes granjas las bases de datos se pueden agrupar por roles y su deploy a múltiples servidores de base de datos Bases de datos se pueden clasificar de la siguiente manera: · Search Database (Search admin db, property db and crawl db) · Content Database · Service Databases(Business Data connectivity, User Profile, Usage and health data collection and state service etc) Estas bases de datos pueden ser compartidos a través de las granjas según tamaño y uso.
Podemos clasificar las topologías como:

1. Small farm topology
2. Medium farm topology
3. Large farm topology
La más habitual: Three-tier farm

 imageimage Web\Query server
imageApplication server
imageclip_image001[4]imageclip_image001[4]Database servers- Search databases\All other SharePoint databases

Pequeñas recomendaciones para mantener las Bases de Datos

  • Se recomienda realizar backups diarios para evitar el crecimiento desmedido de los logs.
  • Las Bases mas demandantes son TempDB data y log, logs de las bases, SearchDB data y log.
  • Para la TempDB se recomienda generar tantos Data Files como cores tenga el servidor.
  • Sería bueno evitar que cada base de datos supere los 200 GB.
  • Realizar tareas de mantenimiento sobre todas las bases de datos.
  • Separa los archivos LDF y MDF en distitos discos o LUNs
  • Monitorea la plataforma a diario para tomar medidas proactivas

Que elementos debemos resguardar en SharePoint 2010

WFE
Algunos ejemplos de items a proteger en estos servidores son:
- Configuraciones de IIS
- Certificados SSL
- Host Headers / Bindings
- Archivos Web.Config
- Customizaciones Varias Site Definitions Web Parts Features Etc…
- Configuraciones del Sistema Operativo - Bits de SharePoint (RTM/SP1/SP2, etc…)

Application Servers 
Algunos ejemplos de items a proteger en estos servidores son:
- Customizaciones Varias
- Servicos de Terceros
- iFilters
- Archivos en el File System (Index de Search)
- Configuraciones del Sistema Operativo - Bits de SharePoint (RTM/SP1/SP2, etc…)

Database Servers
Algunos ejemplos de items a proteger en estos servidores son:
- Bases de Datos de Contenido. WSS_Content_GUID
- Bases de Datos de Sistema . Configuracion . Service Applications (Search, User Profile)
- RBS
- Configuracion de SQL Server . DB Mirroring . Log Shipping . SQL Server Server Settings (Memory, Page Fill Factor, Authentication Methods, DOP Settings)

Configure automatic password change settings

Use the Password Management Settings page of Central Administration to configure farm-level settings for automatic password changes. Farm administrators can configure the notification e-mail address that will be used to send all password change notification e-mails, as well as monitoring and scheduling options. Perform the steps in the following procedure to use Central Administration to configure automatic password change settings.

To configure automatic password change settings by using Central Administration

  1. Verify that the user account that is performing this procedure is a farm administrator.
  2. On the Central Administration Web site, click Security.
  3. Under General Security, click Configure password change settings.
  4. In the Notification E-Mail Address section of the Password Management Settings page, enter the e-mail address of an individual or group to be notified of any imminent password change or expiration events.
  5. If automatic password change is not configured for a managed account, enter a numeric value in the Account Monitoring Process Settings section that indicates the number of days prior to password expiration that a notification will be sent to the e-mail address configured in the Notification E-Mail Address section.
  6. In the Automatic Password Change Settings section, enter a numeric value that indicates the number of seconds that automatic password change will wait (after notifying services of a pending password change) before initiating the change. Enter a numeric value that indicates the number of times a password change will be attempted before the process stops.
  7. Click OK.

Creating a new Sharepoint Site Collection:

# SharePoint cmdlets
Add-PsSnapin Microsoft.SharePoint.PowerShell
# Templates
# Name                 Title                                    LocaleId   Custom
#     ----                 -----                                    --------   ------
# GLOBAL#0       Global template                       1033       False
# STS#0                Team Site                                 1033       False
# STS#1                Blank Site                                1033       False
# STS#2                Document Workspace             1033       False
# MPS#0               Basic Meeting Workspace       1033       False
# MPS#1               Blank Meeting Workspace      1033       False
# MPS#2               Decision Meeting Workspace  1033       False
# MPS#3               Social Meeting Workspace      1033       False
# MPS#4               Multipage Meeting Workspace 1033       False
# CENTRALADMIN#0       Central Admin Site    1033       False
# WIKI#0              Wiki Site                                   1033       False
# BLOG#0            Blog                                           1033       False
# SGS#0                Group Work Site                       1033       False
# TENANTADMIN#0        Tenant Admin Site      1033       False

# Languages
# Name                  Title
#     ----                  -----     
# German               1031
# English               1033
# French                1036
# Spanish               1034

# Set variables
$SiteCollectionName = "Homepage"
$SiteCollectionURL = "http://sharepoint.contoso.com"
$SiteCollectionTemplate = "STS#0"
$SiteCollectionLanguage = 1033
$SiteCollectionOwner = "contoso\UserName"

# Create a new Sharepoint Site Collection
New-SPSite -URL $SiteCollectionURL -OwnerAlias $SiteCollectionOwner -Language $SiteCollectionLanguage -Template $SiteCollectionTemplate -Name $SiteCollectionName

SharePoint 2010 - Supported authentication methods

SharePoint Server 2010 supports authentication methods that were included in previous versions and also introduces support for token-based authentication that is based on Security Assertion Markup Language (SAML). The following table lists the supported authentication methods.

Method category Authentication methods Notes
Windows authentication
  • NTLM
  • Kerberos
  • Anonymous
  • Basic
  • Digest

Forms-based authentication
  • Lightweight Directory Access Protocol (LDAP)
  • Microsoft SQL Server database or other database
  • Custom or third-party membership and role providers

SAML token-based authentication (new with SharePoint Server 2010)
  • Active Directory Federation Services (AD FS) 2.0
  • Third-party identity provider
  • Lightweight Directory Access Protocol (LDAP)
Supported only with SAML 1.1 that uses the WS-Federation Passive Requestor Profile (WS-F PRP).
Client certificate authentication is possible through integration with AD FS 2.0.
For additional information, see Configure Client Certificate Authentication (SharePoint Server 2010

jueves, 7 de marzo de 2013

Consultar lista que excedan los límites

Para garantizar el rendimiento de SharePoint, las listas tienen definidos unos límites que no permiten hacer consultas de elementos por encima de estos. Por ejemplo, si tenemos puesto el límite a 5.000 elementos de lista, no vamos a poder ejecutar una consulta que devuelva un número superior de elementos, salvo que seamos administradores, que tienen otro límite definido y puede ser superior.

Esto no quiere decir que las listas de SharePoint no puedan almacenar más de estos límites, todo lo contrario, si las listas están bien definidas y tenemos una buena infraestructura, las listas soportan un gran número de elementos. El problema de rendimiento nos lo podemos encontrar realizando una consulta que devuelva muchos elementos y que, por ejemplo, se muestre en un sitio sin paginado. Con esta situación nos encontramos con dos problemas, el primero es el ViewState de la página ASP.NET con más de 5.000 filas en una lista, y el segundo en el servidor con esa cantidad de información en memoria.

En SharePoint 2010, tenemos una nueva clase, Microsoft.Office.Server.Utilities.ContentIterator, que nos permite realizar iteraciones sobre los elementos de las listas, sin que nos encontremos con la excepción de límite de consulta superado. Veamos un ejemplo.

protected void QueryWithContentIterator()
{
    //Creamos un CAML Query
    string query = @"<View>
        <Query>
            <Where>
                <And>
                    <BeginsWith>
                        <FieldRef Name='TITLE' />
                        <Value Type='Text'>TF</Value>
                    </BeginsWith>
                </And>
            </Where>
        </Query>
    </View>";
    
    //Instanciamos el iterator y procesamos los elementos del SPQuery
    var iterator = new ContentIterator();
    var listQuery = new SPQuery();
    listQuery.Query = query;
    SPList list = SPContext.Current.Web.Lists["Clientes"];
    //Cuando procesamos los elementos, tenemos que suscribirnos a los eventos de Error y de Procesado de Elemento
    iterator.ProcessListItems(list,
        listQuery,
        ProcessItem,
        ProcessError
    );
}
 
public    bool ProcessError(SPListItem item, Exception e) 
{ 
    //Capturamos el error
    return true; 
}
public void ProcessItem(SPListItem item)
{
    //Código para realizar acciones sobre el elemento actual.
}

Esta nueva clase nos da la posibilidad de hacer consultas procesando elemento a elemento de la misma, aún así, tengamos en cuenta que la interfaz de usuario debería de ser capaz de manejar esta cantidad de datos, por ejemplo, con paginación.

Analizar el rendimiento de nuestras soluciones de SharePoint 2010

Con Visual Studio 11, tenemos nuevas funcionalidades para mejorar nuestro rendimiento desarrollando para SharePoint y mejorar el rendimiento de nuestros desarrollos. En la serie sobre Visual Studio 11 del blog del CIIN, vemos como tenemos nuevos diseñadores de listas, tipos de contenido, nuevas plantillas de proyectos, etc.

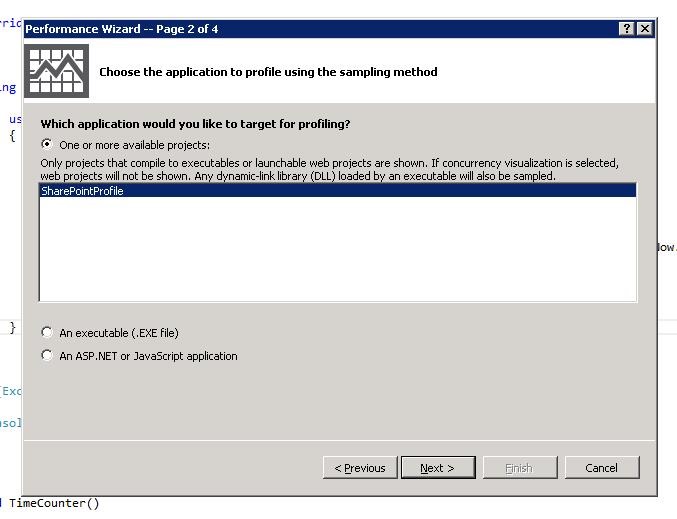
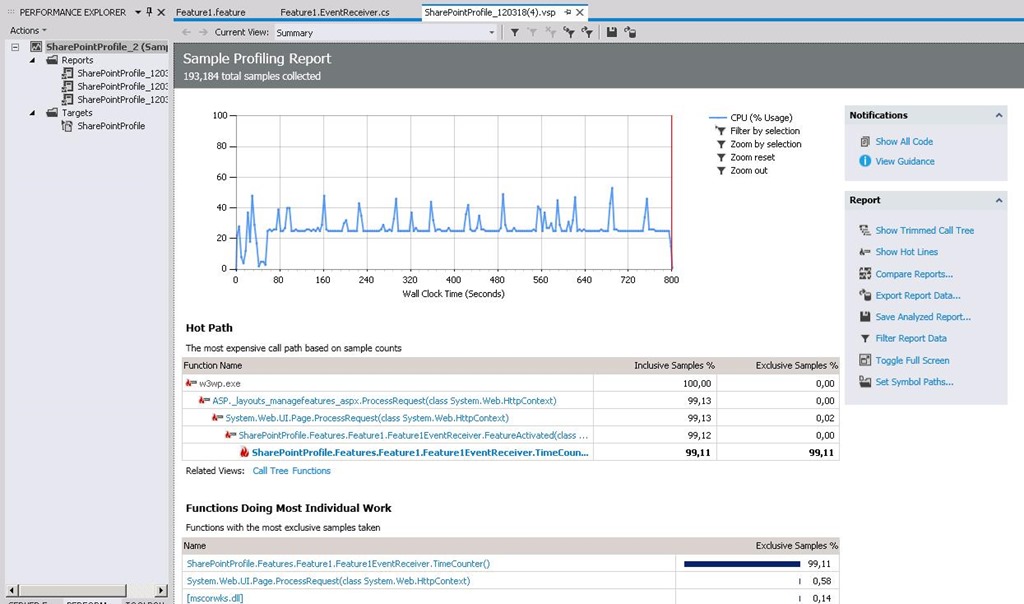
Junto con todas estas novedades, encontramos que podemos utilizar la herramienta de Profiling para analizar el rendimiento de nuestros desarrollos para SharePoint 2010. Utilizando el Performance Wizard, podemos elegir entre los métodos de Profiling y seleccionar nuestro proyecto de SharePoint para analizar.

SharePoint2010_vs2011_profiling_1SharePoint2010_vs2011_profiling_2

Ejecutamos y analizamos el resultado, con el objetivo de mejorar el rendimiento de nuestra solución.

SharePoint2010_vs2011_profiling_3

Como vemos en el informe, el Hot Path nos indica que el método más costoso es nuestro Feature Receiver y que todo el trabajo, Funcions Doing Most Individual Work, se lo está llevando una función que se llama TimeCounter.

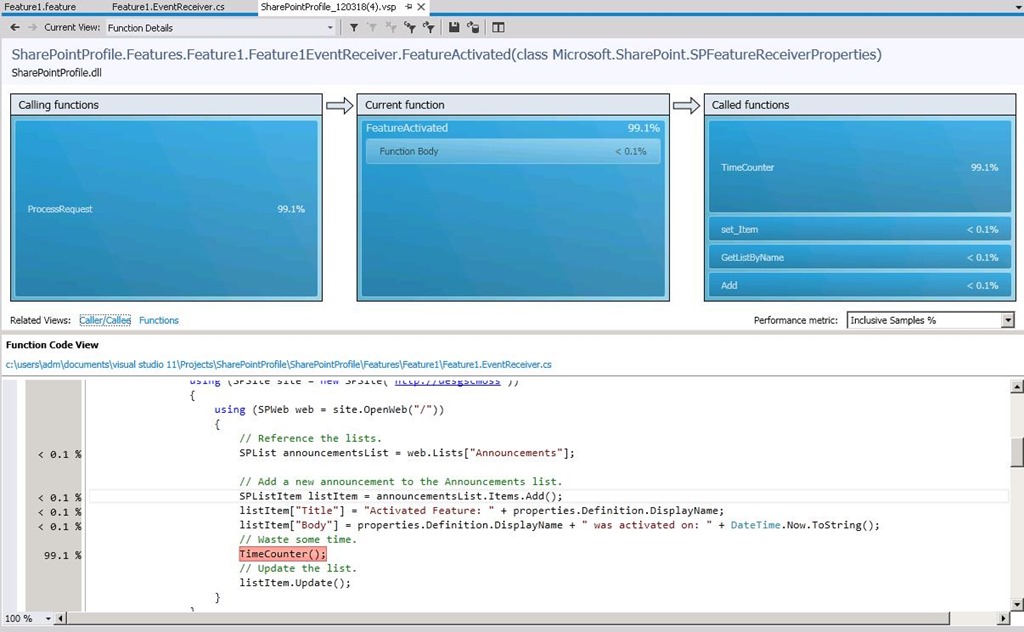
Analizando en detalle la función que nos causa el problema, FeatureActivated, vemos que nos especifica el porcentaje del coste de cada una de los métodos que utilizamos y nos especifica que el problema lo tenemos en TimeCounter.

SharePoint2010_vs2011_profiling_4

Una nueva utilidad que nos permite mejorar nuestras soluciones de SharePoint 2010 y no volvernos locos buscando el problema de una forma más artesanal.

Crear definición de columnas de Metadata desde código

Como todos sabéis, desde Visual Studio podemos crear listas, tipos de contenido y columnas de sitios, que definan nuestra solución y que nos genere un paquete que permita hacer el despliegue en múltiples granjas. También, con este tipo de soluciones, tendremos un control de versiones, utilizando TFS o similar, de nuestro proyecto.

Entre los tipos de columnas que podemos crear, tenemos las columnas de taxonomía o metadatos administrados, que son aquellas que permiten a los usuarios clasificar la información usando la taxonomía empresarial y sus conjuntos de términos.

La mejor forma de crear la definición de estas columnas, de forma declarativa en Visual Studio, es usar el tipo TaxonomyFieldType o TaxonomyFieldTypeMulti, junto a un Event Receiver, cuando se activa la característica, que localiza el conjunto de términos en el servicio de metadatos administrados y lo asocia a la definición de la columna, resumiendo:

Definimos la columna de sitio


<Field ID="{00000000-0000-0000-0000-000000000000}" Type="TaxonomyFieldType" Name="Organismo" DisplayName="Organismo" ShowField="Term1033" Required="FALSE" Group="Columnas Gestión documental"></Field>

Asociamos el conjunto de términos a la columna cuando se activa la característica


SPSite site = properties.Feature.Parent as SPSite;

Guid fieldId = new Guid("{A3AFED68-C20D-4157-81DF-0DCF422853F1}");

if (site.RootWeb.Fields.Contains(fieldId))

{

TaxonomySession session = new TaxonomySession(site);


if (session.TermStores.Count != 0)

{

var termStore = session.DefaultKeywordsTermStore;

var group = termStore.Groups.GetByName("Gestion documental");

var termSet = group.TermSets["Organismos"];


TaxonomyField field = site.RootWeb.Fields[fieldId] as TaxonomyField;


// Connect to MMS

field.SspId = termSet.TermStore.Id;

field.TermSetId = termSet.Id;

field.TargetTemplate = string.Empty;

field.AnchorId = Guid.Empty;

field.Update();

}

}


Para asociar el conjunto de términos, tenemos que acceder al almacenamiento de términos (TermStore), mediante una sesión de Taxonomía (TaxonomySession), obtener el grupo que le corresponda y el conjunto de términos que le vamos a asociar. Todo esto agregando la referencia al ensamblado Microsoft.SharePoint.Taxonomy.

SharePoint 2010. Consultando listas con WCF Data Services

Uno de los métodos que SharePoint 2010 nos ofrece para acceder a los elementos (listas, documentos, etc.) que almacena desde un cliente externo al servidor.
En la versión 2007 de SharePoint existen unos servicios web que nos permitían realizar consultas sobre las listas. Trabajar con estos servicios web complicaban un poco el desarrollo, ya que no sólo teníamos que conocer el modelo que íbamos a consultar, sino saber construir un lenguaje llamado CAML que nos permitía realizar consultas sobre estos datos.Al final, terminábamos desarrollando un servicio web que utilizando el API de servidor de SharePoint devolvía los datos de las listas con un formato un poco más amigable.

La versión 2010 Tenemos la API Microsoft.SharePoint.Client y un servicio que implementa Open Data Protocol usando WCF Data Services. Hoy nos centraremos en este último.

WCF Data Services en SharePoint 2010 ofrece las funcionalidades de la programación de cliente con Data Services, a través del servicio con la url http://<site>/_vti_bin/listdata.svc.

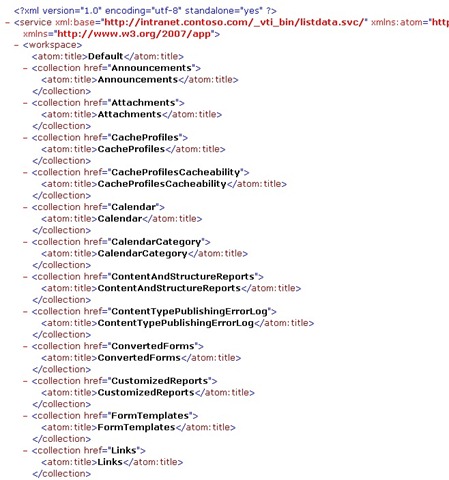
Si accedemos al servicio con un explorador web, obtendremos el Data Service Atom feed con todas las listas del sitio.

SharePoint2010_wcf1

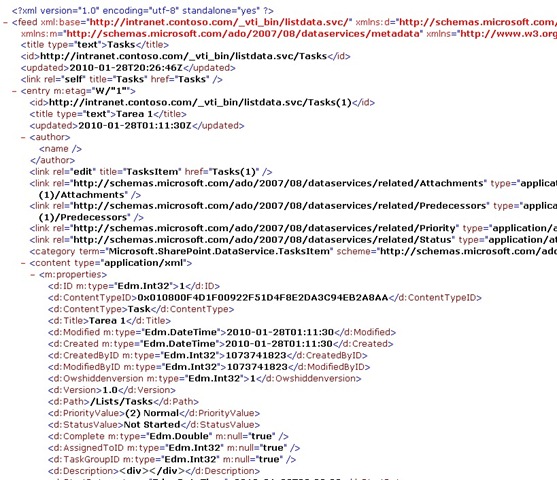
Si queremos consultar la lista Tasks, con poner la url del servicio seguida del nombre de la lista tenemos (http://<site>/_vti_bin/listdata.svc/Tasks), o incluso podemos obtener el xml de un elemento (http://<site>/_vti_bin/listdata.svc/Tasks(1)). También se incluyen todas las opciones de filtrado (http://<site>/_vti_bin/listdata.svc/Tasks?$filter=Description eq 'Tarea 1'), ordenación (http://<site>/_vti_bin/listdata.svc/Tasks$orderby=Description desc) y etc.

SharePoint2010_wcf2

Pero esta no es la idea, está bien poder hacer consultas con el navegador, pero con un par de líneas de código podemos realizar consultas de este tipo o incluso de actualización de los elementos.

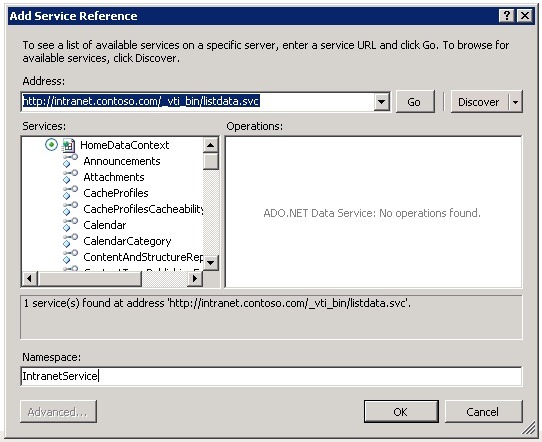
Abramos Visual Studio 2010 y en un proyecto de consola agregamos la referencia de servicio a la url del mismo (http://<site>/_vti_bin/listdata.svc).

SharePoint2010_wcf3

La ventaja de utilizar WCF Data Services para consultar datos en SharePoint es que tendremos un Strongly Type DataContext y Strongly Type List (en el Servicio Web clásico de Sharepoint todas las listas son del mismo tipo y no tenemos diferencia entre ellas). WCF Data Services crea un modelo relacional de objetos para cada lista del sitio que estemos consultando.

Para realizar una consulta sobre la lista Tasks, sólo tendremos que instanciar el HomeDataContext y realizar la consulta con LINQ.

   1: Uri intranetUri = new Uri("http://intranet.contoso.com/_vti_bin/listdata.svc", UriKind.Absolute);
   2:  
   3: IntranetService.HomeDataContext context = new IntranetService.HomeDataContext(intranetUri);
   4:  
   5: context.Credentials = System.Net.CredentialCache.DefaultCredentials;
   6:  
   7: IQueryable<IntranetService.TasksItem> tasks = from t in context.Tasks
   8:                                         where t.Title.Contains("Tarea")
   9:                                         select t;
  10:  
  11: foreach (var item in tasks)
  12: {
  13:     Console.WriteLine("ID {0} - Title {1}", item.ID, item.Title);
  14: }
  15:  
  16: Console.ReadLine();

Igual de simple lo tenemos para realizar inserciones o actualizaciones en la lista.

   1: IntranetService.TasksItem task = new IntranetService.TasksItem();
   2: task.Title = "Tarea 2 desde consola";
   3: task.StartDate = DateTime.Now;
   4: task.Created = DateTime.MinValue;
   5: task.Modified = DateTime.MinValue;
   6:  
   7: context.AddToTasks(task);
   8:  
   9: context.SaveChanges();


Aunque sigamos teniendo los clásicos Servicios Web (/_vti_bin/Lists.asmx) para consultar listas, este servicio con WCF Data Services nos proporciona un modelo de objetos relacional y un contexto que se encarga de realizar las consultas sobre el servicio.